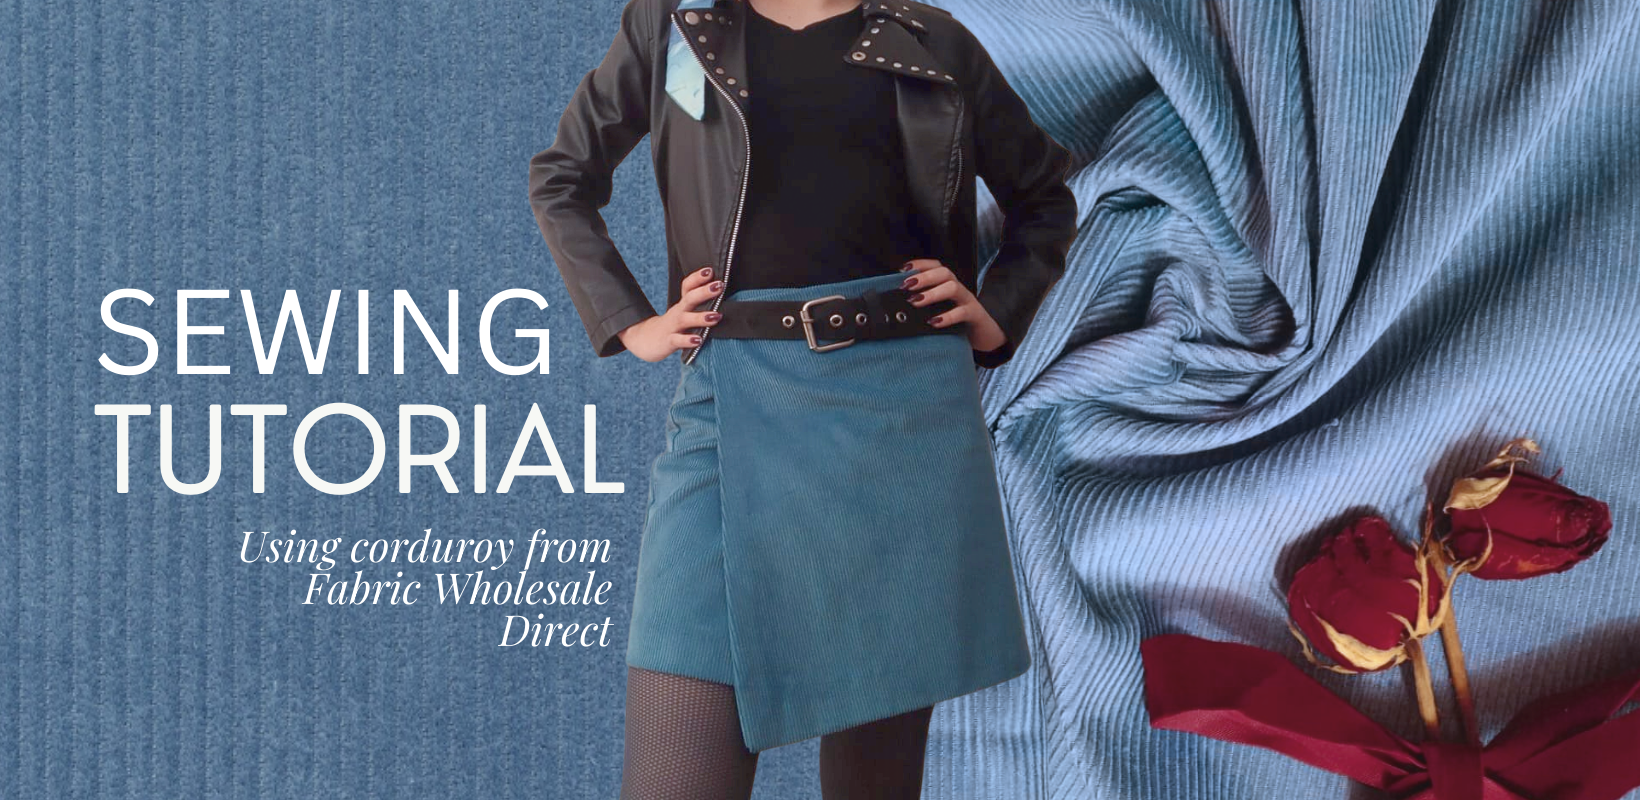
tutorial part 1: wrap skirt
(Using corduroy from Fabric Wholesale Direct)

Whether you pair it with a cozy sweater and warm tights on a chilly day or style it casually for a breezy afternoon, this corduroy skirt and jacket set is both versatile and effortlessly chic! If you love sewing or want to learn how to create a simple, stylish outfit with your own hands, you’re in the right place.
This time Fabric Wholesale Direct was our fabric supplier :). I chose their Standard 9 Wale Corduroy in Denim Blue—it’s vibrant, soft to the touch, and has a crisp yet durable texture. Plus, since it’s made from 100% cotton, it aligns perfectly with our commitment to using materials from natural sources.
Ready to get started? Whether you’ve got your fabric from Fabric Wholesale Direct or plan to upcycle something you already own, this easy tutorial will guide you through creating a beautiful skirt and jacket set. Perfect for beginners and seasoned sewists alike, this step-by-step guide will add a touch of texture and sophistication to your wardrobe with minimal effort—no advanced skills needed!
This tutorial will be divided into two parts. Today, we’ll start with the skirt, so get ready to dive in! By the end, we’ll also share some fantastic outfit ideas to style this versatile piece.
So what do you need for this project?
♡ I´m using corduroy but other fabrics can also work. You can also check out the Fabric Wholesale Direct webstore. (Depending on your size and the length of your skirt, the amount of fabric you will need is from 1 to 2 yards.)
♡ Thread of the color you want.
♡ 6 buttons. (5 for the jacket and 1 for the skirt)
♡ 1 snap fastener
♡ Scissors or a roller cutter.
♡ Sewing machine or needle. (You can also do it by hand although it will require a little more time).
♡ Tape measure.
Now that everything is ready! Time to roll up our sleeves!
WRAP SKIRT
Step 1: Measurements and Patterns
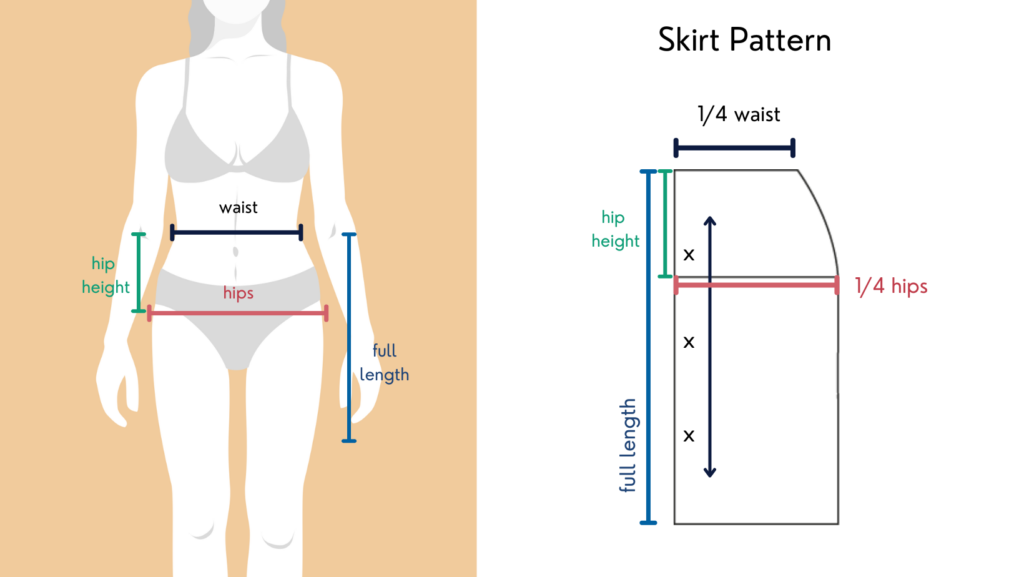
We will create a basic skirt pattern that will serve as a base and to cut the back of the skirt. From this, we can make modifications to trace the front pieces.
All you need to do is take your measurements of:
- Waist
- Hips
- Hip length
- The skirt length of your preference, (can range from mini to maxi).
Follow the image and trace your pattern on paper considering your own measurements.
If you want to learn how to adjust your measurements perfectly, you can also check this article: How to Measure Yourself Correctly.
Step 2: back of the skirt
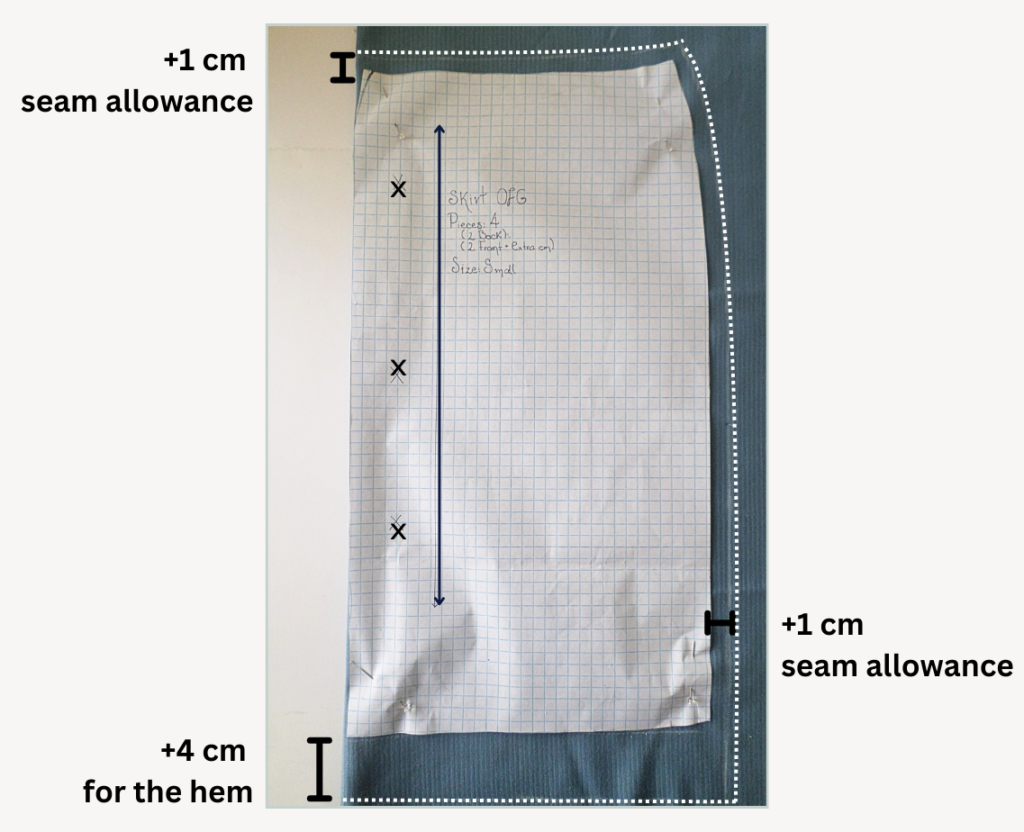
- Fold the fabric in half, aligning the edges. Place the pattern along the folded edge, making sure the side marked with “x” is right on the fold. This way, when you cut it out, you’ll get a complete, symmetrical piece.
- Please note that all tracing should be done on the reverse side of the fabric.
- Pin your pattern in place. Mark the edge. At the bottom we will add 4cm for the hem and at the top and side we will add 1cm as a seam allowance.
- Now you can cut the piece with the added measurements.
step 3: First front piece of the skirt
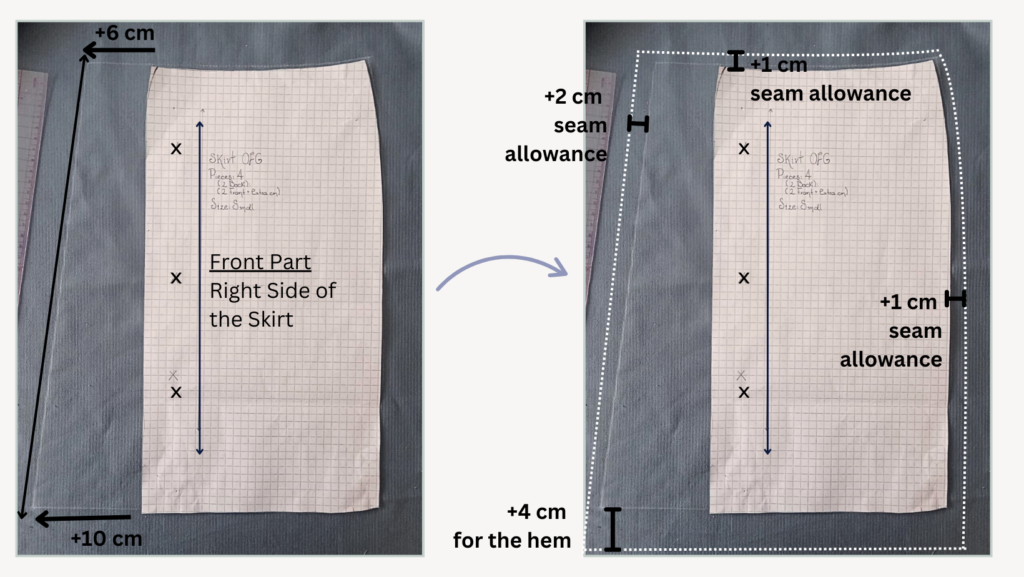
- Now we will trace the first front part of the skirt. To do this, place your pattern on the stretched fabric (we will no longer use the folded fabric). And extend 6 cm at the waist and 10 cm at the bottom, as shown in the image. Then join those two points.
- Once you have this new outline, we will add the seam allowance of 1 cm for the waist, 1 cm for the side (the curved part), 2 cm for the diagonal line and 4 cm for the hem, as shown in the example.
- After this, you can cut the piece.
step 4: second front piece of the skirt
- Now we will trace the second front part of the skirt. To do this, place your pattern backside down on the stretched fabric. And extend the trace 13 cm at the waist and 22 cm at the bottom, as shown in the image. Then join those two points.
- Once you have this new outline, we will add the seam allowance of 1 cm for the waist, 1 cm for the side (the curved part), 2 cm for the diagonal line and 4 cm for the hem, as shown in the example.
- After this, you can cut the piece.
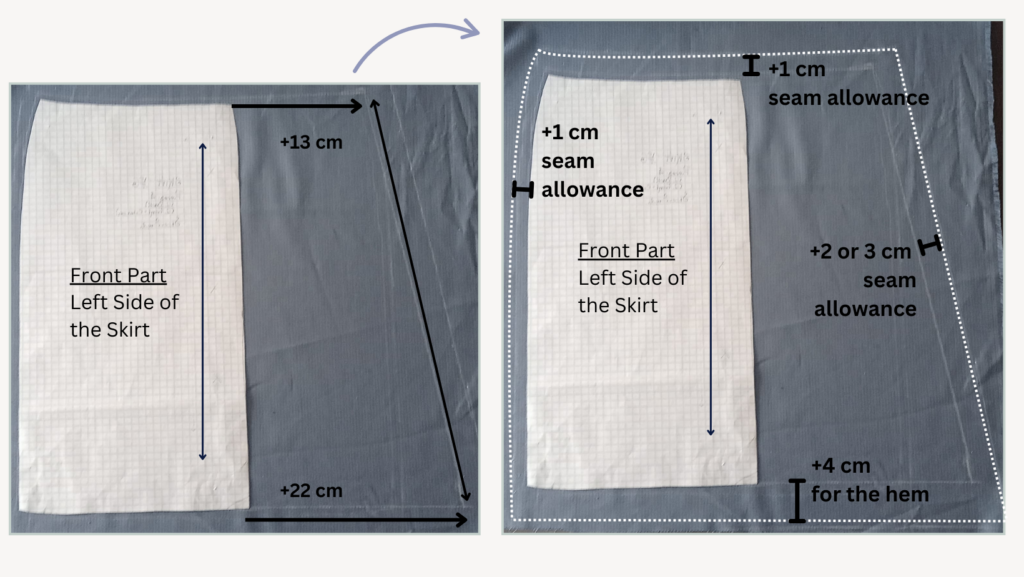
- Now you have your three main pieces ready! They should look similar to the ones in the picture.
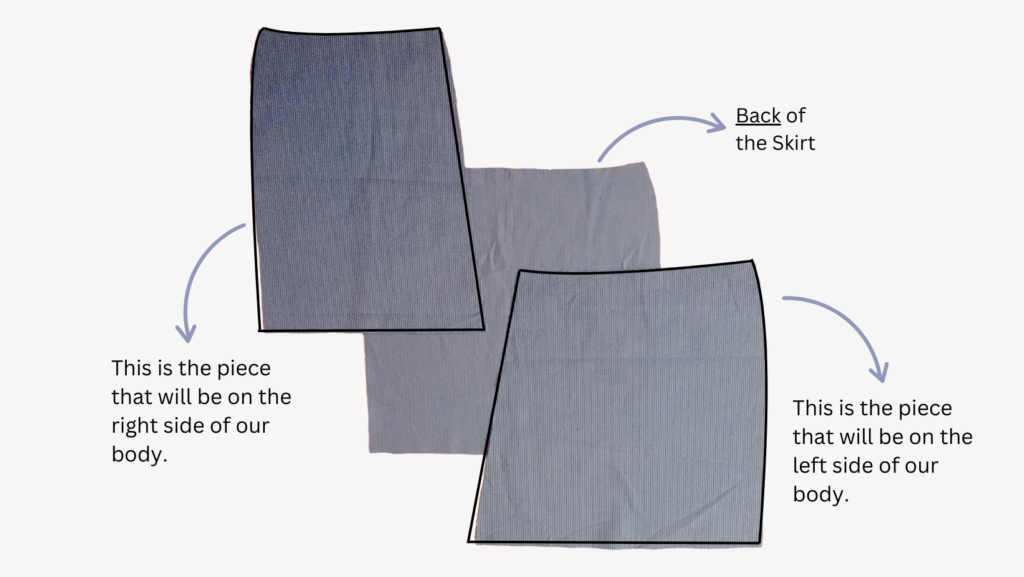
Step 5: Close the sides
- Place one of the front pieces over the back piece of the skirt, so that the fabric is right sides together, now pin them together and sew along the seam allowance line we made previously, as shown in the image.
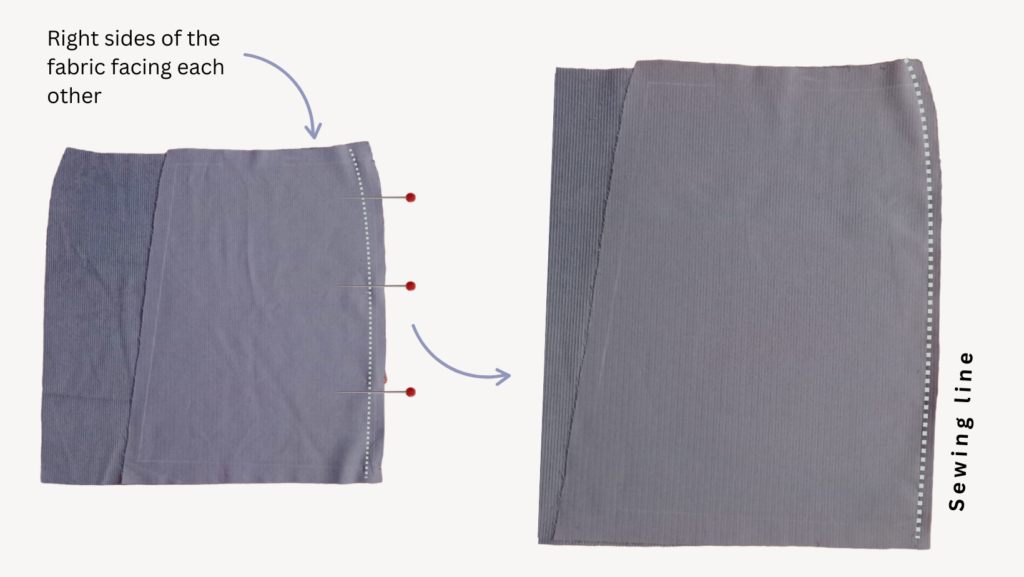
- We will repeat the process with the next front piece: Place the fabric right sides together, pin and sew along the seam edge.
- After completing both seams, your skirt should resemble the one shown in the image below. For the best results, I recommend ironing the seams to help the skirt achieve its ideal shape.
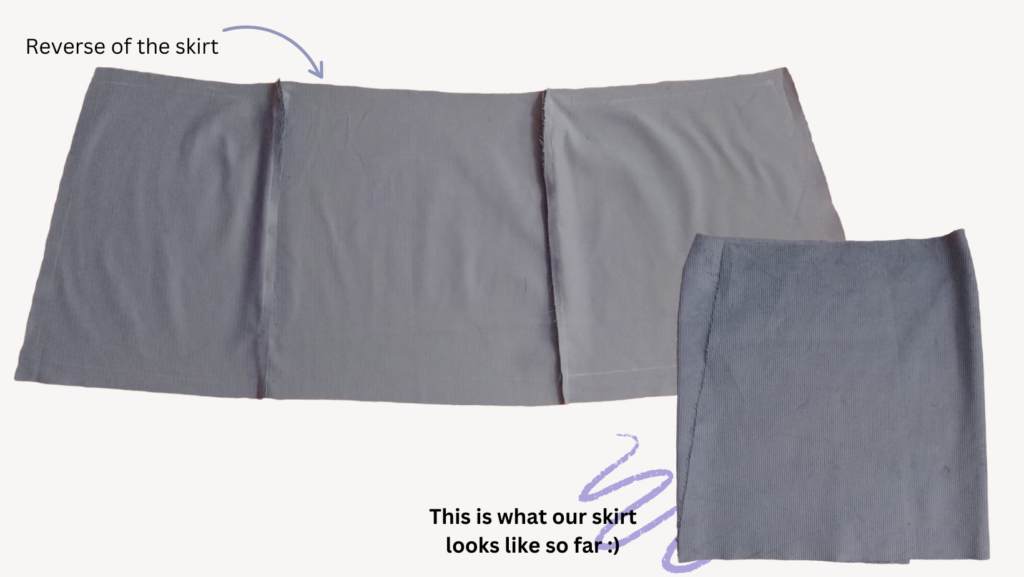
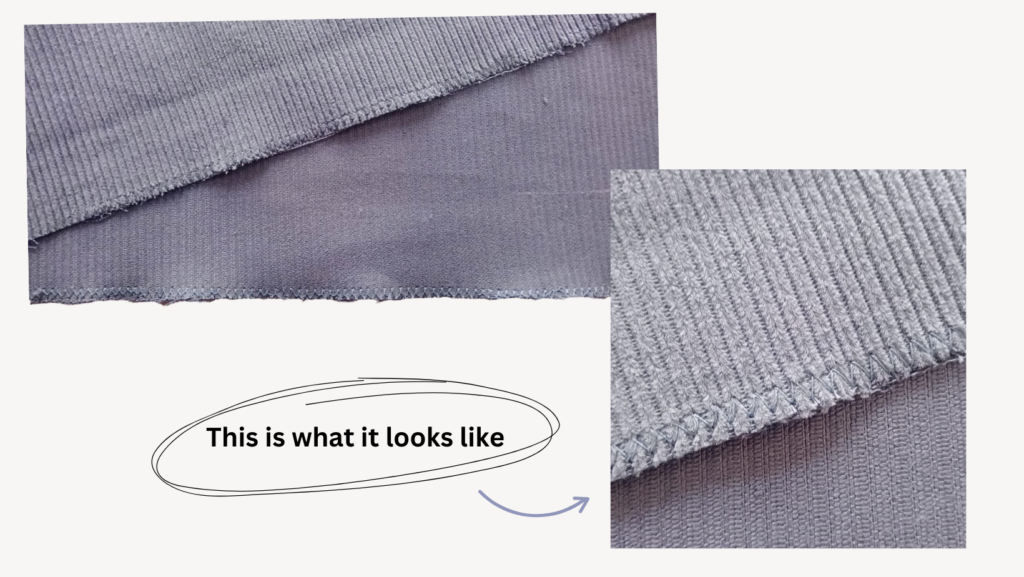
- Now it’s time to finish the edges! Use an overlocker to neaten the sides, inner seams, and hem of the skirt. If you don’t have an overlocker, a zig-zag stitch works just as well. This step will give your garment a polished look and prevent fraying for a clean and professional finish.
Step 6: Mitered corners
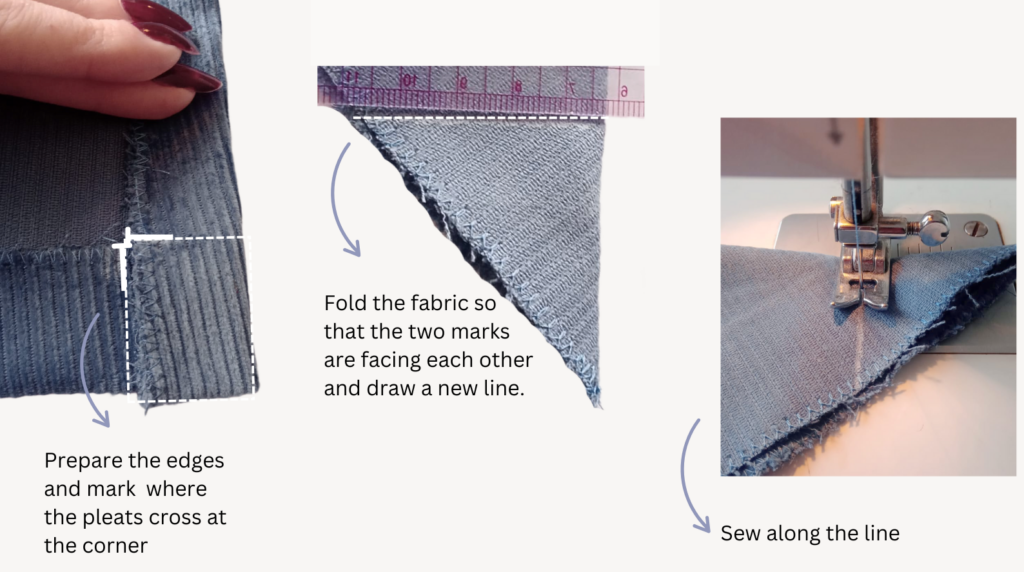
This finish is commonly used to create clean, neat corners. The technique involves folding and sewing diagonally so that the corner is flat and without excess bulk. It’s an elegant detail that will make our skirt look even prettier. Here’s how to do it:
- Prepare the edges: Fold the edge of the fabric along the seam allowance lines and iron to keep them neat.
- Mark the corner: Unfold the ironed edges and mark where the pleats cross at the corner (this forms a square).
- Fold the corner: Fold the fabric diagonally so that the two sides meet at a 45-degree angle and draw a new line to indicate where we will sew.
- Now sew along the line.
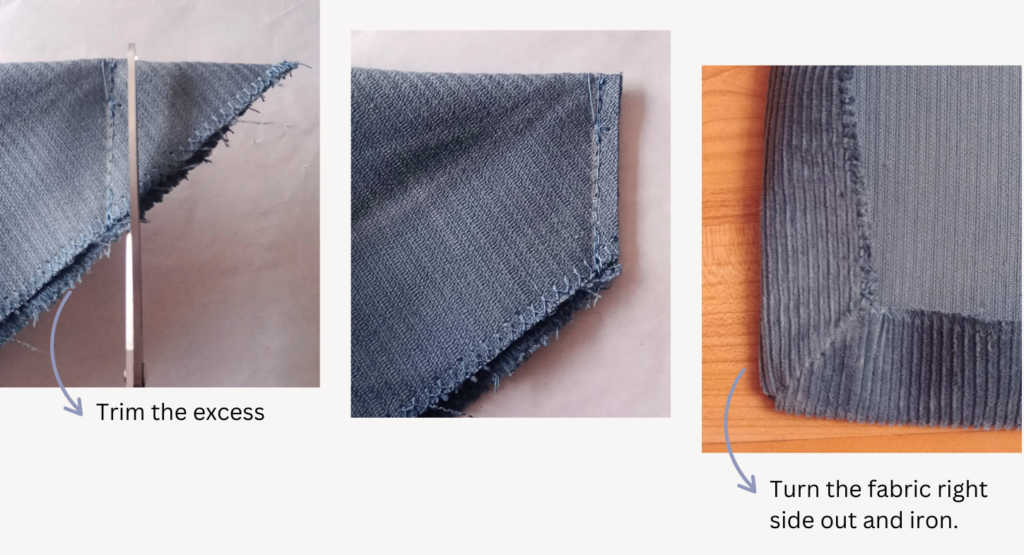
- Trim the excess: Cut the fabric at the corner, leaving a ¼-inch (0.5 cm) seam allowance.
- Then fold the hem again along the original ironed lines.
- The diagonal fold should line up neatly to form a mitered corner.
- Your mitered corner is ready! You can guide yourself with the following images:
Step 7: Draft the Waistband Facing
To give the skirt better structure and durability, we’ll add a facing at the waist.
- Lay the skirt flat on the fabric.
- Trace the top edge of the skirt (the waistband) onto the fabric.
- Measure and mark 8cm (about 3 inches) down from the traced line on both sides.
- Following the curve we’ll mark 8cm, creating a strip that’s 8cm wide.
- This strip will serve as interfacing for the waistband of your skirt. Now you can cut the piece.
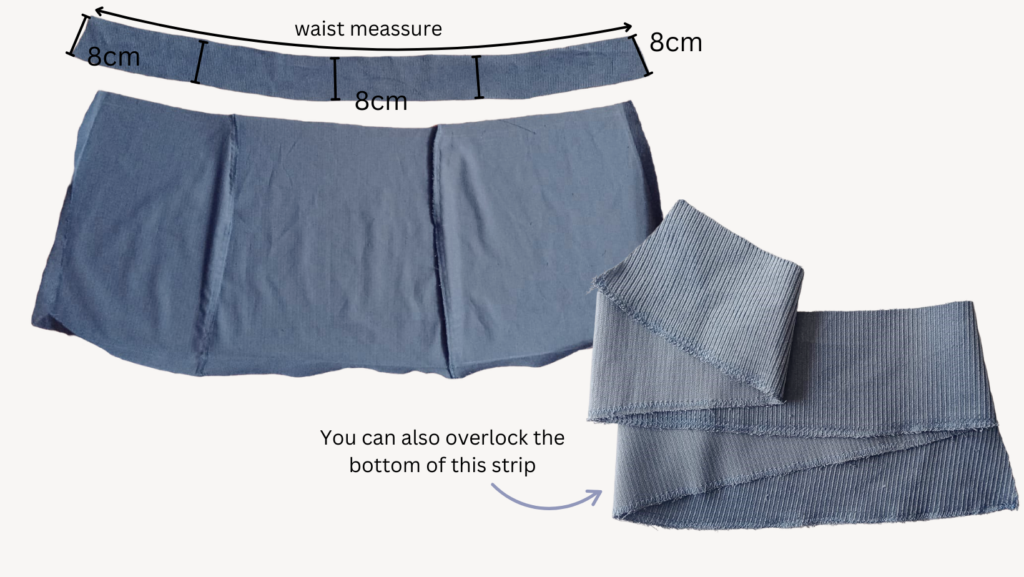
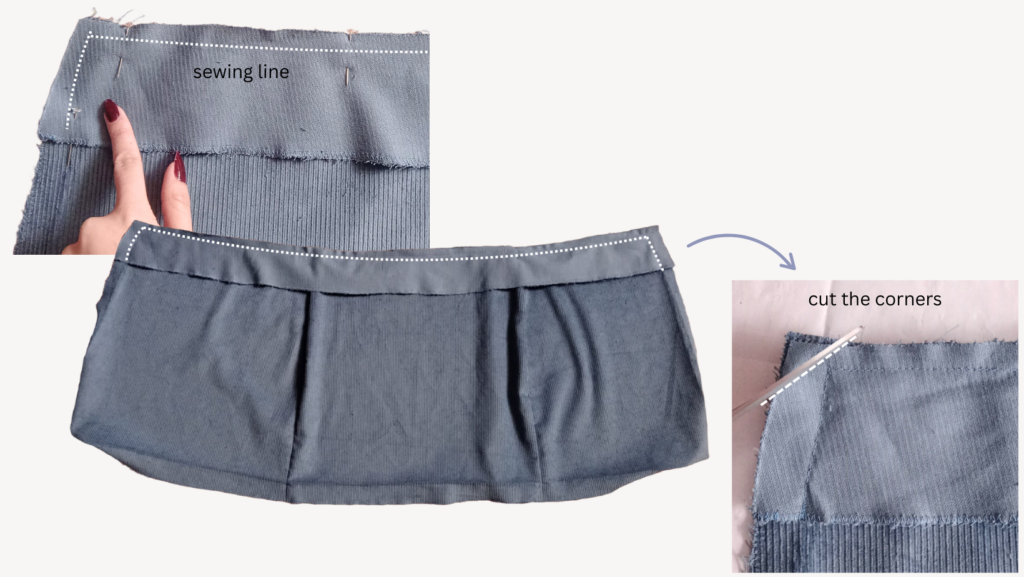
- Once your waistband facing piece is ready, place it right sides together with the skirt and secure it with pins. Next, sew along the edge as shown in the image. Finally, trim the corners and turn the facing to the inside of the skirt.
Step 8: topstitching the facing
- With the waistband facing and skirt now sewn together, lay the fabric flat along the seam you just stitched and press it with an iron to make it more manageable.
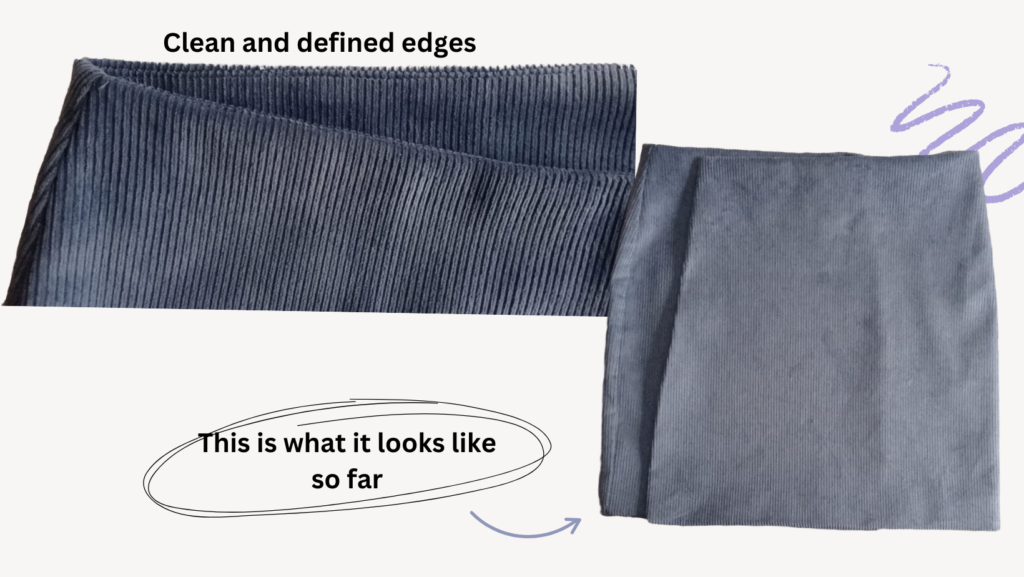
- Keeping the fabric extended, sew a topstitch along the entire length of the waistband seam. Be sure to stitch on the facing side, not on the front of the skirt, for a clean and professional finish.

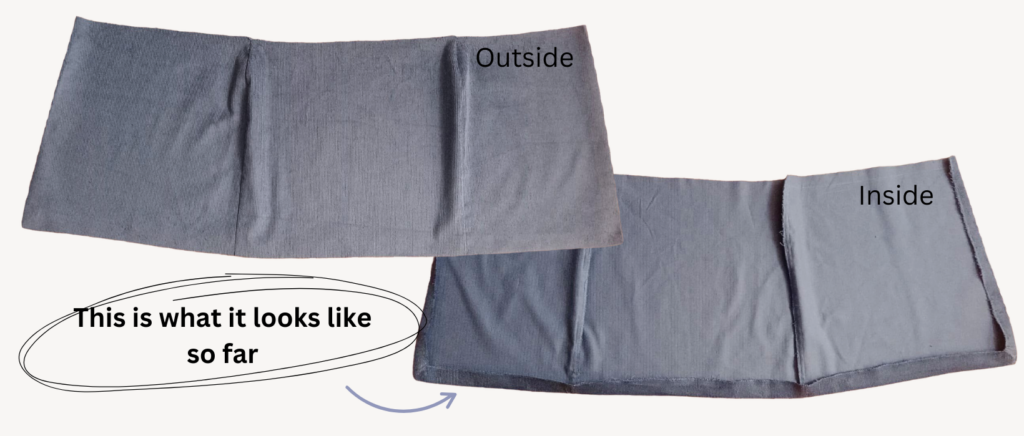
Once you’ve completed this step, your skirt should resemble the images below, showcasing a cleaner and more defined structure.
We’re almost there—just a few more steps to go!
Step 9: Finish the hem and side seams properly.
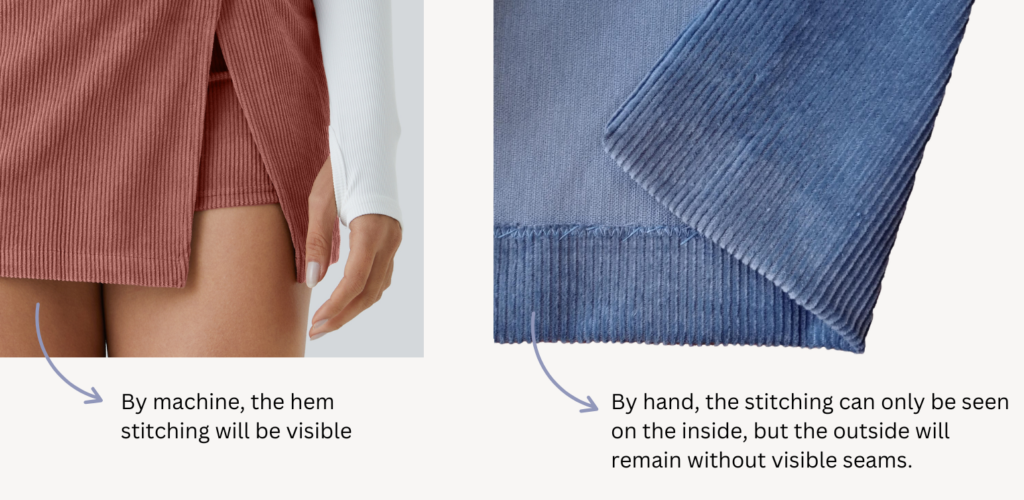
- Use a sewing machine to stitch about ¼ inch (0.6 cm) from the edge along the sides and hem to secure the fabric and prevent it from unraveling.
- Hand-sew using an invisible stitch for a cleaner finish.
I chose to go with the invisible stitch for this project!
But I will leave you reference images on how it would look in both ways.
Step 10: Buttons and buttonholes
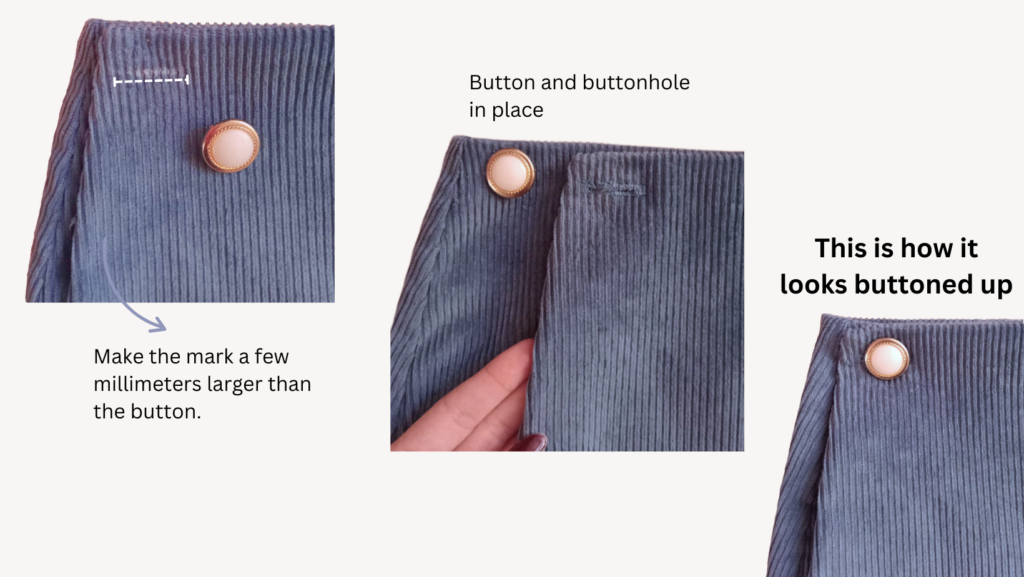
- Wrap the skirt around your waist to simulate the final fit, making sure it fits comfortably and hugs your body. Use pins to hold the skirt in place temporarily.
- Once you’ve identified the ideal placement, make a small mark where you want to sew the button, making sure to mark both the top layer of fabric (where the buttonhole goes) and the bottom layer (where we’ll be placing the button).
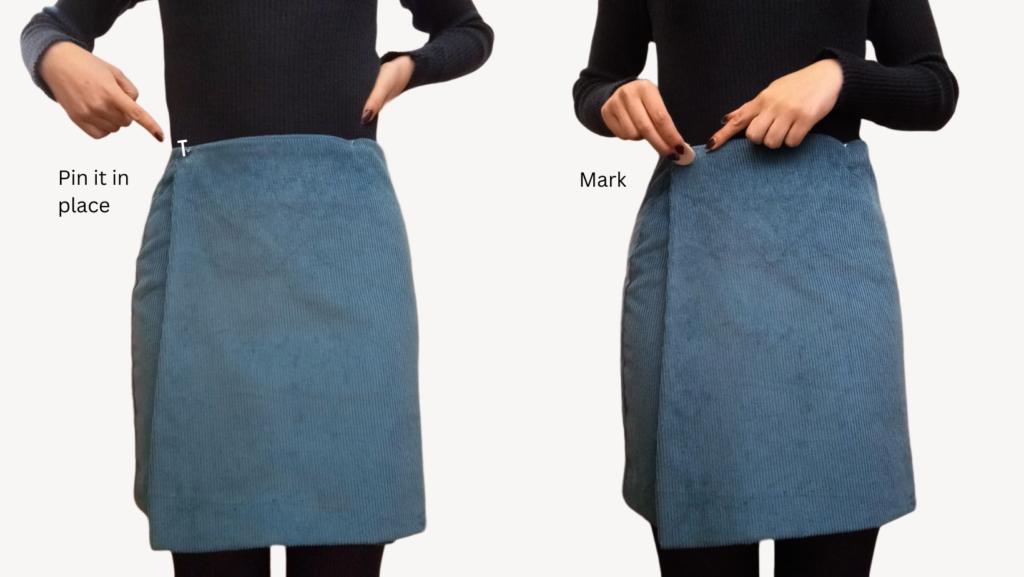
- Mark the Buttonhole: Use the marks you made earlier to draw a line where the buttonhole will go, ensuring it matches the size of your button.
- Switch your sewing machine to the buttonhole setting. If unsure, refer to your machine’s manual for guidance.
- Place the fabric under the presser foot, aligning the mark with the buttonhole guide. Stitch around the marked line to create the buttonhole.
- Carefully use a seam ripper or small scissors to cut the fabric inside the buttonhole. Take care not to cut the stitches.
- Position the button on the corresponding mark on the lower fabric layer. Thread a needle, secure the thread, and sew the button in place. Ensure it’s tight but not too close to the fabric to allow easy fastening.
- Finally button and unbutton the skirt to ensure the fit and function are correct. Adjust if needed.
(You can also do this by hand by drawing the line where you want the buttonhole, carefully cutting along the marked line and making small stitches around the edges.)
step 11: The snap fastener
To securely hold the inner and outer layers of the skirt in place, we’ll sew a snap fastener.
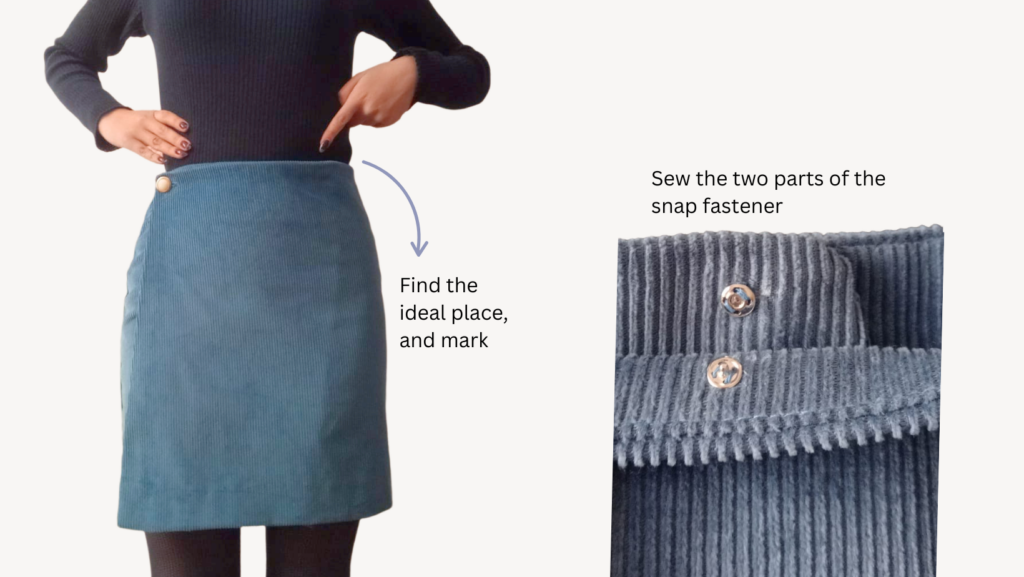
- Decide where the inner layer of the skirt will overlap with the outer layer. Place the snap fastener at this point to ensure the skirt stays in place while worn.
- Use chalk or a fabric marker to mark the exact spots where the snap pieces will go (one on the inner layer and the other on the outer layer).
- Take the stud part of the snap and sew it onto the marked spot on the inner layer using small, secure stitches.
- Attach the socket part to the marked spot on the outer layer in the same way.
- Snap the two pieces together to ensure they align properly and hold the skirt securely.
With the snap fastener in place, your skirt is now complete and ready to wear! 🎉
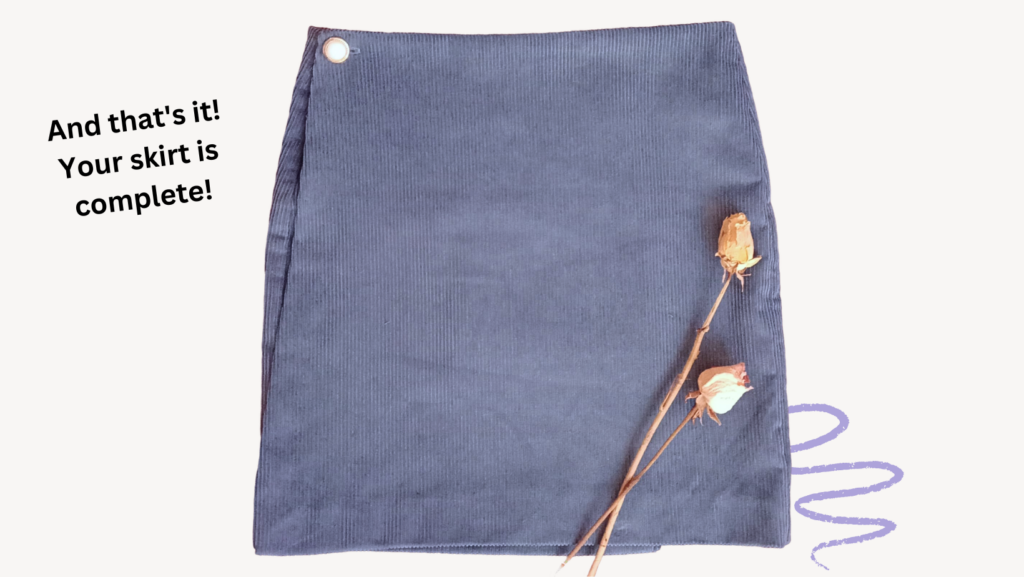
Congratulations on reaching the end of this tutorial!
You’ve created a versatile wrap skirt that combines comfort and adaptability, making it a perfect addition to any wardrobe. Its design allows it to fit effortlessly into many different styles, whether you’re going for a casual daytime look or a more polished outfit for an evening out.
Now that your wrap skirt is ready, let’s explore the endless possibilities for styling it! From cozy knits and ankle boots for cooler days to flowy blouses and sandals for warmer weather, this skirt can easily be the centerpiece of any look. Check out some inspiration for outfits you can create with your new piece.

Sewing your own clothing is not only a beautiful and rewarding hobby but also a sustainable way to express your style. By making your own pieces, you’re reducing waste and crafting garments with love and care.
A special thanks to Fabric Wholesale Direct for providing the stunning corduroy fabric used in this project.
Don’t miss the second part of this tutorial, where we’ll complete the matching jacket to create a chic two-piece set. Stay tuned for more sewing inspiration, and let’s continue creating a wardrobe that’s both stylish and eco-conscious!




Leave a Reply